Craft blog by: OOLY
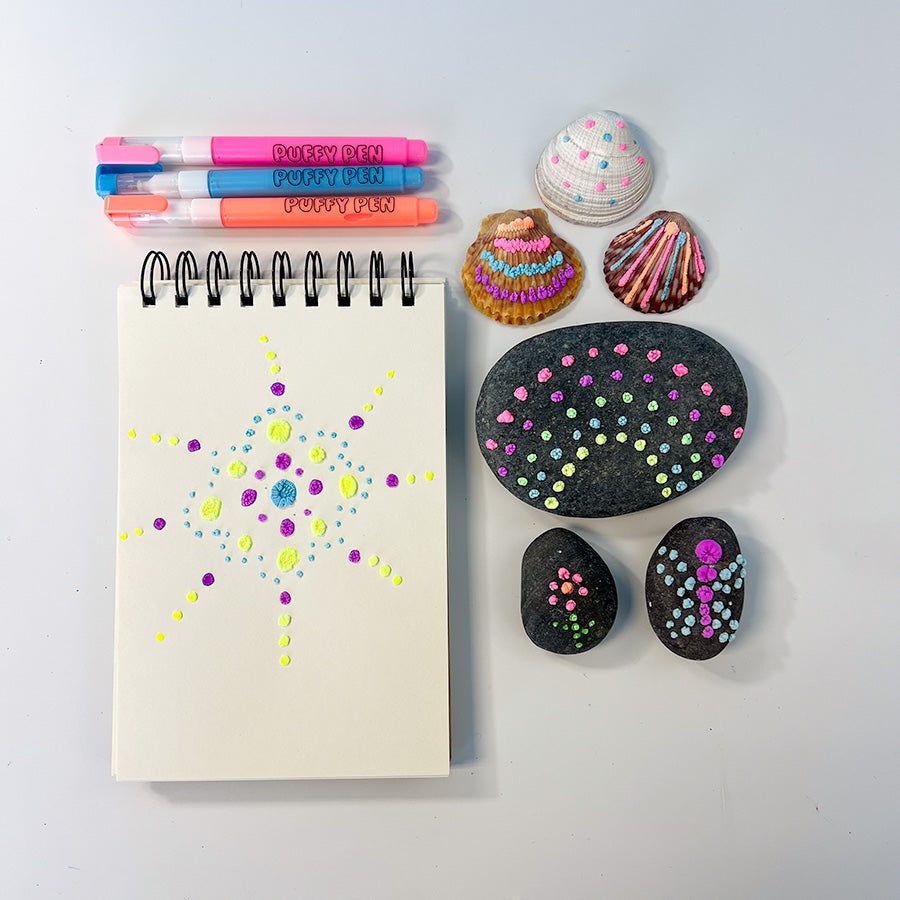
Ready to turn your creativity into a magical 3D masterpiece? With OOLY Magic Puffy Pens, you can draw, dry, heat, and voilà—watch your art puff up into a sensational textured design! These pens come in 6 vibrant neon colors and deliver a mesmerizing puffy effect that’s perfect for fun crafts for kids or any age. From decorating seashells and designing dazzling mandalas to crafting colorful rock art, these easy and exciting projects will spark joy and inspire creativity. Get ready to explore these easy DIY projects that turn everyday crafting into a vibrant, puffy masterpiece—perfect for screen-free fun the whole family can enjoy!
Magic Puffy Pen: Rock Rainbow

Time Duration: 20 minutes
Skill Level: Beginner
OOLY Products Needed:
Other Items Needed:
- Rocks
- Hair Dryer
Directions:


Step 2: Using your OOLY Magic Puffy Pens, squeeze small dots onto your rock to create the base of your rainbow. Start with a half-circle shape and one color at a time. Keep adding dots in alternating colors, working your way outwards from the base. You can also add colorful patterns, flowers, or abstract shapes.

TIPS: First, shake OOLY Magic Puffy Pens to mix the paint. Squeeze the pen as you draw to get good ink flow. While the ink dries, let the hair dryer run for 2 minutes on high heat, so it gets hot enough. Then hold it about a half of an inch away from the paint for it to puff up!

Magic Puffy Pen: Seashells

Time Duration: 20 minutes
Skill Level: Beginner
OOLY Products Needed:
Other Items Needed:
- Seashells
- Hair Dryer
Directions:


Step 3: Create as many unique seashell designs as you’d like! Let the shape of each shell inspire your creativity, making every piece truly one-of-a-kind and extra special.

TIPS: First, shake OOLY Magic Puffy Pens to mix the paint. Squeeze the pen as you draw to get good ink flow. While the ink dries, let the hair dryer run for 2 minutes on high heat, so it gets hot enough. Then hold it about a half of an inch away from the paint for it to puff up!
Magic Puffy Pen: Mandala-Inspired Design

Time Duration: 20 minutes
Skill Level: Beginner
OOLY Products Needed:
Other Items Needed:
- Hair Dryer
Directions:


Step 3: Then, add heat using a hair dryer (adult supervision required) to make the ink puff up like popcorn! Watch your mandala dots magically puff up and create a mesmerizing 3D effect. Let the design cool down before showing it off to friends and family!
TIPS: First, shake OOLY Magic Puffy Pens to mix the paint. Squeeze the pen as you draw to get good ink flow. While the ink dries, let the hair dryer run for 2 minutes on high heat, so it gets hot enough. Then hold it about a half of an inch away from the paint for it to puff up!
With these three fun and simple crafts, OOLY Magic Puffy Pens bring a whole new dimension to creativity! Whether you're decorating seashells, crafting vibrant mandalas, or transforming rocks into colorful treasures, the puffy, textured designs are sure to impress. Perfect for kids or crafters of any age, these projects offer screen-free fun and endless opportunities for self-expression. Grab your Magic Puffy Pens and let your imagination come to life—one puffed-up masterpiece at a time!
We would love to see photos of your craft projects! Tag us on Instagram at @WeAreOOLY using #OOLYcreateyourhappy.
2020 Magic Puffy Pen Craft Ideas

How to use Magic Puffy Pens:
- Give your pen a little shake and squeeze it to get the ink flowing.
- For a more defined picture, use thinner outlines and less ink.
- Let the ink dry for approximately 5-10 so it won’t run when you heat it. (Please note: the ink might still be tacky)
- Once your drawing is complete, use a high-heat hair dryer close to your design. Place the heat over the ink for about 20 seconds at first until you start to see it puff up. (Please note: the surface you are heating can get very hot. Wear oven mitts or something protective if you decide to pick up your artwork as you are heating it.)
- Watch as your art changes from ink to puff in under a minute.

Fun ways to explore with Magic Puffy Pens:
1. Play with Cardboard
Cardboard is a wonderful surface for puffy pens...and it’s free! Play with different cardboard shapes and designs. You can even layer your cardboard to create more dimension.


2. Doodle on Rocks
Using puffy pens on rocks is very fun! Keep your design simple, and when it comes to heating your rock, be sure to use something protective for your hands, such as an oven mitt, as your rock will heat quickly.

3. Decorate Wood
Search the wood section of your local craft store for wood cut-outs to decorate. I had lots of fun turning a simple wooden horse into a colorful piece of art. Puffy Pens would also work great to decorate wooden frames for a special gift.

4. Design Craft Letters
Craft letters are a great way to decorate a wall in a child’s room or playroom. Make your craft letter even better by adding a three-dimensional effect with magic puffy pens.

5. Add Dimension to Coloring Pages
Turn your coloring page into a mixed-media masterpiece by adding dimensional elements with your Puffy Pens.

If you’re on Instagram we’d love to see what you create.
Tag your post #OOLYCreateYourHappy and be sure to follow along with OOLY to stay up-to-date on more fun art supplies, DIYs, and creative ideas.
-Craft Blog by Sam Sarles (@colormadehappy)


